-40%
RA-1 Repeater Adaptor Motorola GM300 CDM 1250 RICK
$ 26.39
- Description
- Size Guide
Description
DEAR VALUED CUSTOMERS:BEFORE BUYING THIS PRODUCT:
Please check out the
MONEY-SAVING TIP
below.
===================================================================================
ITEM DESCRIPTION
:
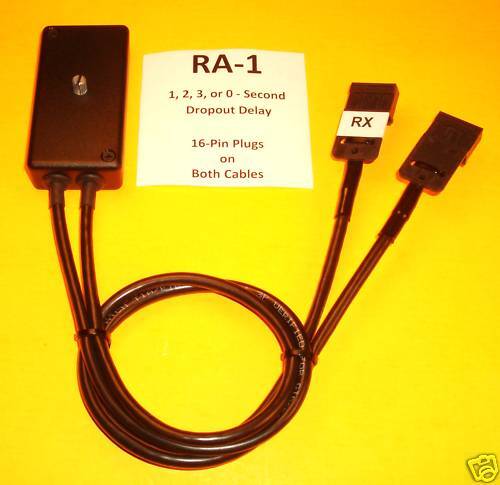
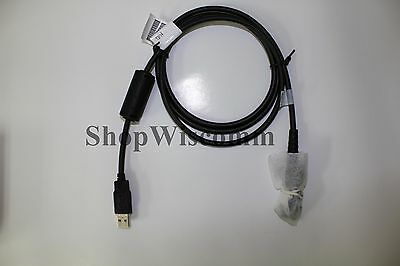
RA-1 REPEATER ADAPTOR FOR MOTOROLA RADIOS
Affordable RICK alternative
Installs easily
Works great
No radio modifications
FEATURES
3-Second Dropout Delay
(Can be shortened to 2, 1, or 0 seconds by simple internal jumper changes)
Great Sounding Audio
Adjustable Repeat Audio Level
Compact unit measures 1.6 x 3.2 x .80". 20" radio cables
Mounts securely with 3M Dual Lock fasteners, included.
Available Options (must be purchased same time as Repeater Adaptor)
:
Ignition Sense
leads installed on one or both radio connectors = .00 per radio
https://www.ebay.com/itm/125056584970
External Speaker
leads installed on one or both radio connectors = .00 per radio
https://www.ebay.com/itm/125056586869
Want it with
NO dropout delay (fixed at 0 seconds)?
Please check out the
RA-0
, which is compatible with a
wider variety of radio models
. Click on
MRE Direct
, above.
Introducing the
RA-1
Repeater Adaptor. This handy device converts two Motorola mobile radios into a
one-direction
repeater. Signals received by the RX radio are retransmitted by the TX radio (not vice-versa). If you want to repeat signals in
both
directions, please check out the
RA-2
, Bi-Directional Repeater Adaptor
(click on
MRE Direct
, above).
RA-1 IS COMPATIBLE WITH THE FOLLOWING MOTOROLA RADIO MODELS:
The RECEIVE radio can be any one of the following
:
16-pin
Maxtrac, GM300, M10, M120, M208, M216; or CDM750, CDM1250, CDM1550, CDM1550LS+.
The TRANSMIT radio can be any one of the following:
16-pin Maxtrac, GM300, M10, M120, M208, M216; or CDM750, CDM1250, CDM1550, CDM1550LS+
.
Mix or Match:
The Receive & Transmit radios can be the same model, or
different models
.
Want to use an
M400
,
Maratrac
,
or
5-pin Maxtrac
as the
TRANSMIT
(not receive) radio? Please check out the RA-1M
(click MRE Direct, above).
Six pages of detailed instructions and application notes are included (
see excerpts below
). Free email support is available, too, if you need help setting it up (it's easy). Please check out the positive feedback from thousands of satisfied customers who have purchased my products.
The RA-1 can be used if
:
A: Your radios appear on the above list (models not listed above are not compatible with RA-1, but may be compatible with RA-0).
B: You are equipped to
program
both radios, and:
C: The
receive
radio provides an active-low carrier detect signal on pin 8 of its accessory connector.
All of the radio models listed above (except M400, Maratrac, and 5-pin Maxtrac) either provide a carrier detect signal on pin 8, or are capable of being programmed to provide this signal. Your receive radio's carrier detect signal (COS output) can be verified with the procedure described below if desired.
How can I verify my 16-pin receive radio provides an active-low COS output on Pin 8
?
1.
First, read the radio with RSS. Go to the Radio Wide Configuration screen (F2). Here, (if the radio has an expanded logic board), you will find a choice of
F9
. Press F9. This takes you to the Accessory Connector Configuration screen, where the definitions of pins 4,6,8,9,12 & 14 can be viewed or changed. Check to see if Pin 8 is already set as: (Description =
PL/DPL & CSQ Detect
; Data Direction =
Output
; Debounce =
No
; Active Level =
Low
). If yes, this radio can be used as the receiver for your repeater. If no, change Pin 8 to these parameters and write the change back to the radio. Now it can be used as the receiver.
I have read my radio with RSS, but I do not see any option for changing the accessory connector (F9 does not appear on the Radio Wide Configuration screen).
What now?
2.
It might still be usable. On some 16-pin models, Pin 8 provides an active-low COS output, even though the accessory connector is not fully programmable. Check Pin 8 with a dc voltmeter (positive probe to Pin 8, negative probe to ground). Do you see approximately +5 volts on Pin 8 with the receiver squelched, and less than 0.1 volts when receiving a signal with the correct PL? If yes, this radio will work as the repeater receiver. No? Go to step 3.
3.
Repeat the measurement from step 2, but this time, use a pull-up resistor to +12v (wrap one end of a 10k resistor around the positive voltmeter probe and connect the other end of the resistor to +12v). Reconnect the positive voltmeter probe to Pin 8. You should now see +12 volts on Pin 8 with the receiver squelched. Does this drop to less than 0.1 volts when receiving a signal with the correct PL? If yes, this radio will work as the repeater receiver.
Where do I find Pin 8 on the accessory connector
?
(16-pin radios): With the radio upside down and the accessory jack facing you, Pin 8 is on the bottom row, 4th pin from the right.
I've measured the voltage on Pin 8 as described in steps 2 and 3, but I am not seeing an active-low transition when the radio unsquelches
.
What now?
On some radios, even though the accessory connector is not fully programmable, Pin 8 can be made to provide an active-low COS output, by programming the radio in
Repeater Mode
(see step 4).
4.
From the Main Menu, select F3 (GET/SAVE). Do you see an option of F6 (Change to Repeater Mode)? If so, try the following steps:
Press F6 (Change to Repeater Mode).
Press F2 (Read Repeater), and then press F10 for a Generic Repeater.
Press F10 again to skip the transmit radio. Connect the programming cable to the receive radio and press F2 to read it. Keep pressing F2 until you reach the GET/SAVE menu. Then press F10, followed by F4. You will now be back at the CHANGE/VIEW menu, in
Repeater Mode
.
Press F5 (Mode Configuration). Set the repeater type to Generic and enter your receive frequency and PL. There is only room to enter ONE (receive only) frequency & PL on this screen, but that's okay.
Write this change back to the radio. This should cause Pin 8 to provide an active-low COS output (verify this with a voltmeter as described in steps 2 & 3 above).
After you've programmed the radio in Repeater Mode (to get Pin 8 to behave as active-low COS), you can either leave it in Repeater Mode (if this radio will be dedicated solely to repeater receiver use), or you may return to the GET/SAVE menu and change it back to Radio Mode, which will allow you to program additional frequencies, if you wish. Pin 8 will remain set as active-low COS in either case.
RA-1 INSTALLATION
:
Plug the RX cable into the 16 or 20-pin receive radio. On 16-pin radios, install a 2-inch jumper wire if necessary (included) between pins 15 & 16 of the RX plug, to enable the receive radio's internal speaker.
On 20-pin (CDM) radios, the speaker jumper wire is not needed. Simply insert the RA-1's 16-pin RX plug into the radio's 20-pin jack, leaving 2 unused radio pins on either side of the plug. The 20-pin jack on the CDM radio is designed to accept either a 16 or 20-pin plug (a 20-pin plug is only needed for applications that use pins 17 thru 20). The 16-pin plug and 20-pin jack fit perfectly and are keyed (mistake-proof). They can only go together the correct way.
Plug the other cable into the accessory connector of the transmit radio.
A jumper plug (included) connects to the front mic jack of the receive radio to ground the mic hook switch, keeping the receiver in CTCSS mode.
Use your RSS to enable the transmit radio's timeout timer and reduce the RF power level to approximately one-half of maximum. Position the transmit radio in a ventilated location and use a fan to provide plenty of airflow across the heat sink. Ensure that both radios are grounded to the same power supply. Connect a suitable antenna system - either two antennas with adequate physical separation, or one antenna and a properly tuned duplexer.
Please click on
"
Store View
"
, above, to see other related items.
===========================================================================================
MONEY-SAVING TIP:
MRE1032 is pleased to offer
FREE UNLIMITED COMBINED SHIPPING.
BEFORE PAYING
, please browse our
eBay Store,
MRE DIRECT
,
for additional products you may be interested in.
To enter our store, click the small "Door" icon near the top-right of this listing.
When buying multiple items, you can save on shipping.
HERE'S HOW
:
Don't click
"Buy it Now"
and pay for each item separately,
because this results in
separate shipments and shipping fees
for each item.
INSTEAD:
click
"
ADD TO CART
"
for each item
When all desired items are in your cart,
transmit
ONE
PayPal payment for the entire order
. This way,
you'll pay to ship only ONE (1) item.
ANY & ALL
additional products
on the same payment
ship free - no limit !
Mobile App Users
: If an "Add to Cart" button is not visible on eBay's mobile app, use a computer instead.
===========================================================================================
RECEIPT OF PAYMENT
is expected within 7 days after purchase.
ALL ORDERS SHIP WITHIN 24 HOURS
after receipt of payment.
U.S. SHIPPING ONLY
Due to excessive losses involving international orders, we regret we are no longer shipping outside the United States or replying to emails regarding same
.
===========================================================================================
